
Torres del Paine is a national park located in southern Chilean Patagonia. It’s highlights include jagged mountains, brightly coloured lakes, glaciers, rivers and golden grasslands. The most famous sight of all being the incredible 3 rock towers which give the park it’s name.
The first time I saw a photo of Torres Del Paine was just over a year ago, the colours and shapes of the rock looked like something from another planet and from that moment I knew I had to go there myself.
So we planned that during our time in Chile we would embark on our first ever multi day hike, the ‘W-Trek’ at Torres del Paine National Park. To say it involved a little planning in advance is an understatement… with the popularity of the trek rising each year, camping spots are limited and prices are rising. This trek is the only thing in South America which we had organised well in advance. We began the painful process of booking the campsites 6 months in advance (maybe slightly excessive? I’m not sure!).
In this rather huge post I will cover the organisation of booking the campsites, what hiking/ camping gear you need, the route of the trek itself (for beginner trekkers like me!) and how much it all cost us (warning, it is not cheap).
Please note: The below prices were based on the current exchange rate (March 2018) of $850 CLP to £1 GBP.
What is the W-Trek?
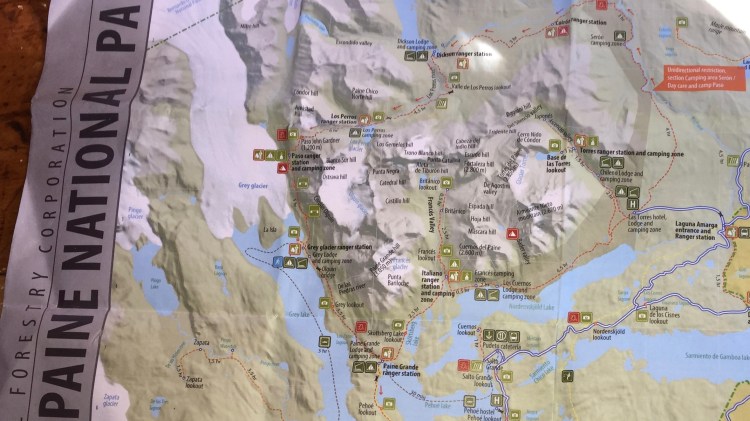
The W-Trek is exactly what it sounds like, a trek in the shape of a W, in the Torres del Paine National Park. It includes the 3 main highlights of Torres del Paine National Park; Glacier Grey, Frances Valley and the base of The Towers.
It seemed that the most popular way for doing the W-Trek is in 4 nights, trekking from West to East, starting with the trek up to Glacier Grey on the first day and the final day being the base of the towers on day 5. Which is how we decided to do it. If you are quick trekkers, it is also certainly possible to do the trek in 3 nights and 4 days. However as this was our first ever multi-day trek, we decided we would allow ourselves 4 nights.
How to get to Torres del Paine
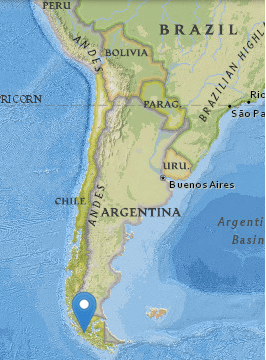
Torres del Paine is a national park located in the very South of Patagonia in Chile, about 2 hours away from the town of Puerto Natales. Puerto Natales is therefore a popular base for hikers before and after the trek, with plenty of hostels, outdoor shops and places to stock up on supplies for the trek.
In Puerto Natales we stayed in a hostel called ‘Kiooshtem‘ for 2 nights before and 2 nights after our trek. This hostel was one of our favourite hostels in South America so far. The hosts are awesome, the showers are hot and the beds are soo comfy. You can also hire all your gear for the trek through them for a really good price and they will look after your luggage in a storage room which you are trekking. We stayed in the 6 bed dorm and it cost us about £11 each per night.
Daily buses run to and from the national park from Puerto Natales every day, we caught the 7.20am bus with ‘Bus Gomez’ for $15,000 CLP (£18) (this also included an open return ticket with a choice of a return bus at 2.30pm or 19.45pm on whatever day you go back to Puerto Natales).
Once in the park, you have to get off the bus to pay your entrance fee ($21,000 CLP/ £25). If you are planning on doing the W-Trek from West to East (like we did) then get back on the bus until the catamaran stop. The bus will arrive at the catamaran stop about 10.15am and the catamaran leaves at 11am. There are apparently some waterfalls nearby if you fancy visiting them while you wait, we decided to have a coffee while we wait instead. Once on the catamaran, you have to buy your catamaran ticket, it cost $18,000 CLP (£21) per person and the boat will drop you off at Paine Grande about half an hour later.
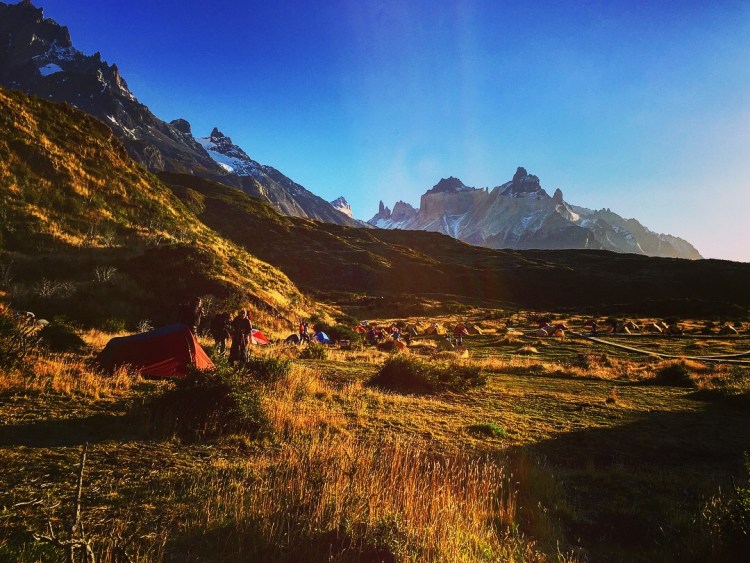
Camping in Torres del Paine

In order to do the W-Trek, campsites must be reserved in advance. From research it seemed that campsites get booked up well in advance. As this trek would be near the start of our trip, this wasn’t a problem for us. We therefore began booking our campsites 6 months in advance to ensure we had our desired campsites. Below is a list of the 4 campsites we stayed in, which company they can be booked with, and how much they cost us:
- Night 1 – Camping Grey (Vertice Patagonia) Cost: $18 USD for 2 persons – £6.50 each
- Night 2 – Camping Paine Grande (Vertice Patagonia). Cost: $18 USD for 2 persons – £6.50 each
- Night 3 – Camping Frances (Fantastico Sur). Cost: $20,000 CLP for 2 persons – £12 each
- Night 4 – Camping Chileno, full board mandatory (Fantastico Sur) Cost: $120,000 CLP for 2 persons – £70 each
Vertice Patagonia:
Booking campsites in advance through Vertice Patagonia was a painful process. We were informed to make our reservations online which was simple enough, we then received a confirmation of the reservation, however we then had to wait for them to send a ‘Webpay’ link to be able to finalise the reservation. Which is when it got painful.
After 2 months of emailing with no response I resulted in emailing 10 email addresses in one go: ventas01@verticepatagonia.cl as well as ventas02@verticepatagonia.cl, ventas03@verticepatagonia.cl and so on… I emailed until ventas10 and eventually I got provided with a link for payment. Yay!
Fantastico Sur:
This was a LOT easier. We booked and paid through the website (http://int.fantasticosur.com/en/online) and received our confirmation via email. Nice and easy!
Gear for the W-Trek
As we are travelling very light, the majority of our gear (apart from clothes) had to be rented in advance. As mentioned, we hired the hiking gear from our hostel (Kiooshtem) in Puerto Natales. All of the hiking gear cost us £66 each in total for the 5 days.
Here is a list of the gear we took with us:
- 1 x two man tent
- 1 x sleeping bag each of -10 comfort level (double wrap in garbage bags to avoid getting wet whilst trekking)
- 1 x sleeping bag liner each
- 1 x sleeping matt each
- 2 x hiking poles each (an essential in my opinion!)
- 1 x head torch each
- 1 x cooking stove
- 1 x gas canister
- 2 x mugs
- 2 x plastic bowls
- 2 x sporks
- 4 x packed lunches each. Our daily packed lunches consisted of the following each: 1 piece of plain bread, 1 piece of fresh fruit, 1 bag of dried fruit, nuts, cereal bar and a few sweets)
- 3 x evening meals each – Instant noodles or packet rice (We only had 3 evening meals as we had food provided on our final night)
- 8 x coffee sachets
- 1 x towel each
- 1 x washbag (toothpaste, toothbrush, deodorant, wet wipes)
- 1 x daybag
- 1 x set of day clothes each (long sleeve top & leggings, I also bought a spare pair of leggings but 1 pair would have been fine)
- 1 x set of WARM evening clothes each – long sleeve top + thermal top and leggings, thick jumper and merino wool socks (double wrap evening clothes in garbage bags in the day to avoid getting wet)
- 1 x waterproof coat each
- 1 x hat and gloves each (I also packed my Buff)
- 3 x pairs of socks each
- 1 x hiking shoes each (although Shaun hiked in trainers)
- 1 x pair of pumps or flip flops each for the evening
- 1 x camera
- 1 x waterproof action camera
- 1 x mobile phone in zip locked bag
- Lots of plastic bags and bin liners for all of the above
Hiking the W-Trek: Our Route
Day 1: Paine Grande – Glacier Grey (11 km, 4 hours)
So after we had caught the 7.20am bus from Puerto Natales, paid our entrance fee and caught the 11am Catamaran to Paine Grande we had some lunch before hiking the 11km from Paine Grande up to Glacier Grey.
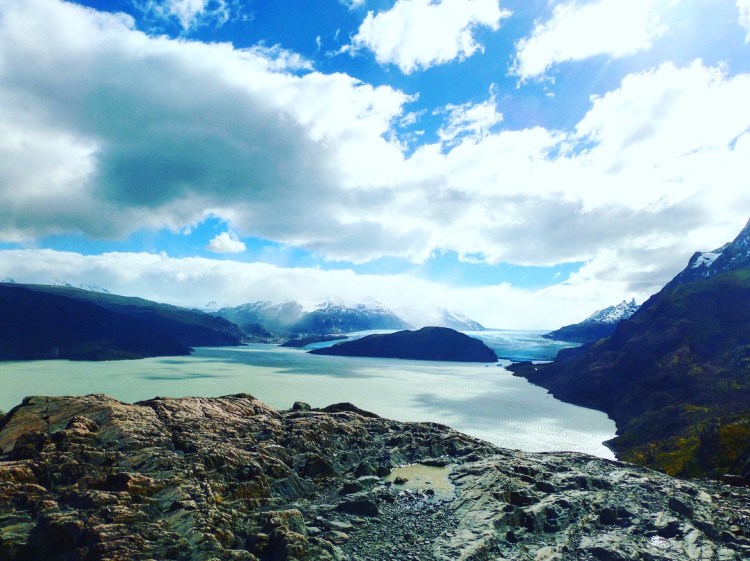
The trek begins with a gradual incline until you reach the view of the lake with the glacier in the distance, it was such an incredible sight, the water was so blue and I had never seen such impressive raw nature. This turned out to be my favourite view of the whole W Trek!
We were really lucky with the weather on day 1, it was windy but not too much around 70/80kph so we were able to take our time, take lots of photos and enjoy the incredible views.
Day 2: Camping Grey – Glacier Grey Lookout – Paine Grande (13 km – 4.5 hours)
After walking to the Glacier Grey lookout in the morning (about 30 mins hiking) we then started the 11 km hike back down to Paine Grande. This was probably the toughest day for us (due to the weather) and this was also the day I became terrified of the wind. From what I’ve heard, the wind was something between 104 kph and 127 kph that day. Whilst walking along the mountain edge, this was absolutely terrifying.
Once this terrifying ordeal was over and we were back down safely at Paine Grande campsite (where it was also ridiculously windy) it started to rain. So we then had the joy of putting our tent up in heavy rain AND strong wind. It’s safe to say we (mainly Shaun and our tent) got absolutely soaked!

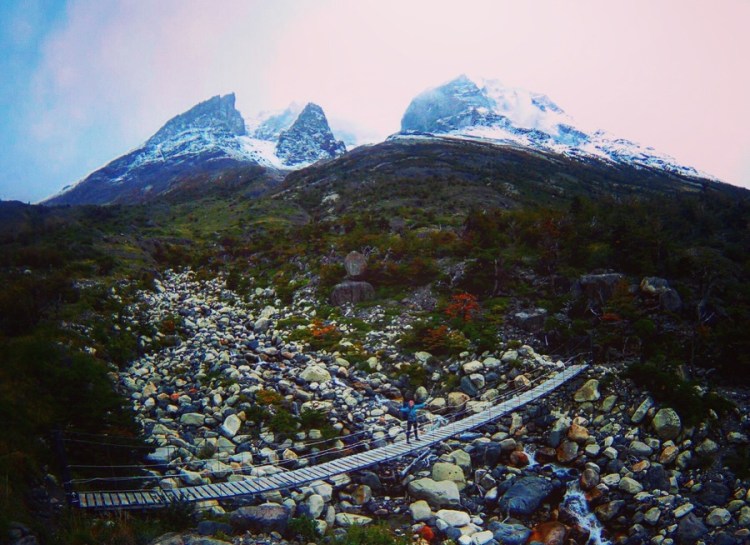
Day 3: Paine Grande – Frances Valley – Camping Frances (14 km – 5.5 hours)
After a storm the night before we amazingly woke up to clear blue skies on day 3 and… no wind! Thanks to this perfect weather, this was our easiest day by far and a perfect day for incredible views of the mountains, the lake & the frances valley.
We firstly hiked the 7.5km from Paine Grande – Camp Italiano, where we dropped our big bags and then hiked up to the first Frances Valley viewpoint (we didn’t make it all the way up to the Britanico viewpoint, we were too slow and we also wanted to save our legs for the next 2 longer days) we took our time and enjoyed the pretty views and then hiked back down to Italiano to grab our bags. It was then only an hour of hiking to go until we reached our campsite for the night, camping Frances.
Warning: There were mice at Camp Frances, so hang your backpack in the trees!


Day 4: Camping Frances – Chileno Campsite (20km – 6 hours)
On day 4 we woke up to heavy rain and a leaky tent, looking back we suspect it had been nibbled by mice in the night. We took down our tent in the rain and then set off for the 20 km trek from Camp Frances to Chileno.
This was actually a pretty comfortable trek, we were trekking faster than all the other days and we were getting used to carrying the big packs on our back and there was only a bit of light rain. The last 5 km up to Chileno was the toughest part (especially as we got lost for a steep 2 km near the end and saw puma footprints!).
It was snowing as we finally arrived at our final campsite of the trek, campsite Chileno. Which was pretty cool! The trail to the famous towers was closed when we arrived (due to the weather) and we were told it might even be closed the next morning.
Day 5: Campsite Chileno – Base of The Towers – Central/ Welcome Centre (14 km – 6 hours)
On the final day of our trek our luck was in, the trail to the towers was re-opened and the sky was pretty clear. It took us 2 hours to hike up to the towers that morning. Hiking up the boulders for the last 20 minutes of the trek was pretty scary due to the snow and with that plus the strong wind at one point I wanted to turn around and go back… but that would have been stupid. We completed it and it was 100% worth it. It then took us 2.5 hours to head back down to Chileno where we grabbed some lunch before the final 1.5 hour hike to the end!

Visiting Torres Del Paine was like a dream come true, the landscape is literally like nothing I have ever seen before. That moment standing in front of the impressive towers of Torres Del Paine, after 5 days of trekking in the wild land of Patagonia, will forever remain a highlight for me.
Total Costs
| Cost Per Person | |
| Return bus ticket to the park: | £18 |
| Park entrance fee: | £25 |
| Catamaran to Paine Grande: | £21 |
| Camping Grey | £6.50 |
| Camping Paine Grande | £6.50 |
| Camping Frances | £12 |
| Camping & Full Board at Chileno | £70 |
| Shuttle bus from Central to the bus back to Puerto Natales | £3.50 |
| Food for the trek | £10 |
| Rental Gear for the trek | £66 |
| TOTAL | £238.50 per person* |


Amazing and clear article thank you so much! I’m currently living in Chile and loving it but I haven’t had a chance to go to Torres del Paine and don’t think I will before I leave the country in a few months… I’ll definitely look into this article again if I do go though! Enjoy your travels 🙂
LikeLiked by 1 person